 Showcase Feature
Congratulations Nermine from Bev Tully’s Friday morning class.
A stunning implementation of Helen Eriksson’s design
Showcase Feature Congratulations Nermine from Bev Tully’s Friday morning class.
A stunning implementation of Helen Eriksson’s design
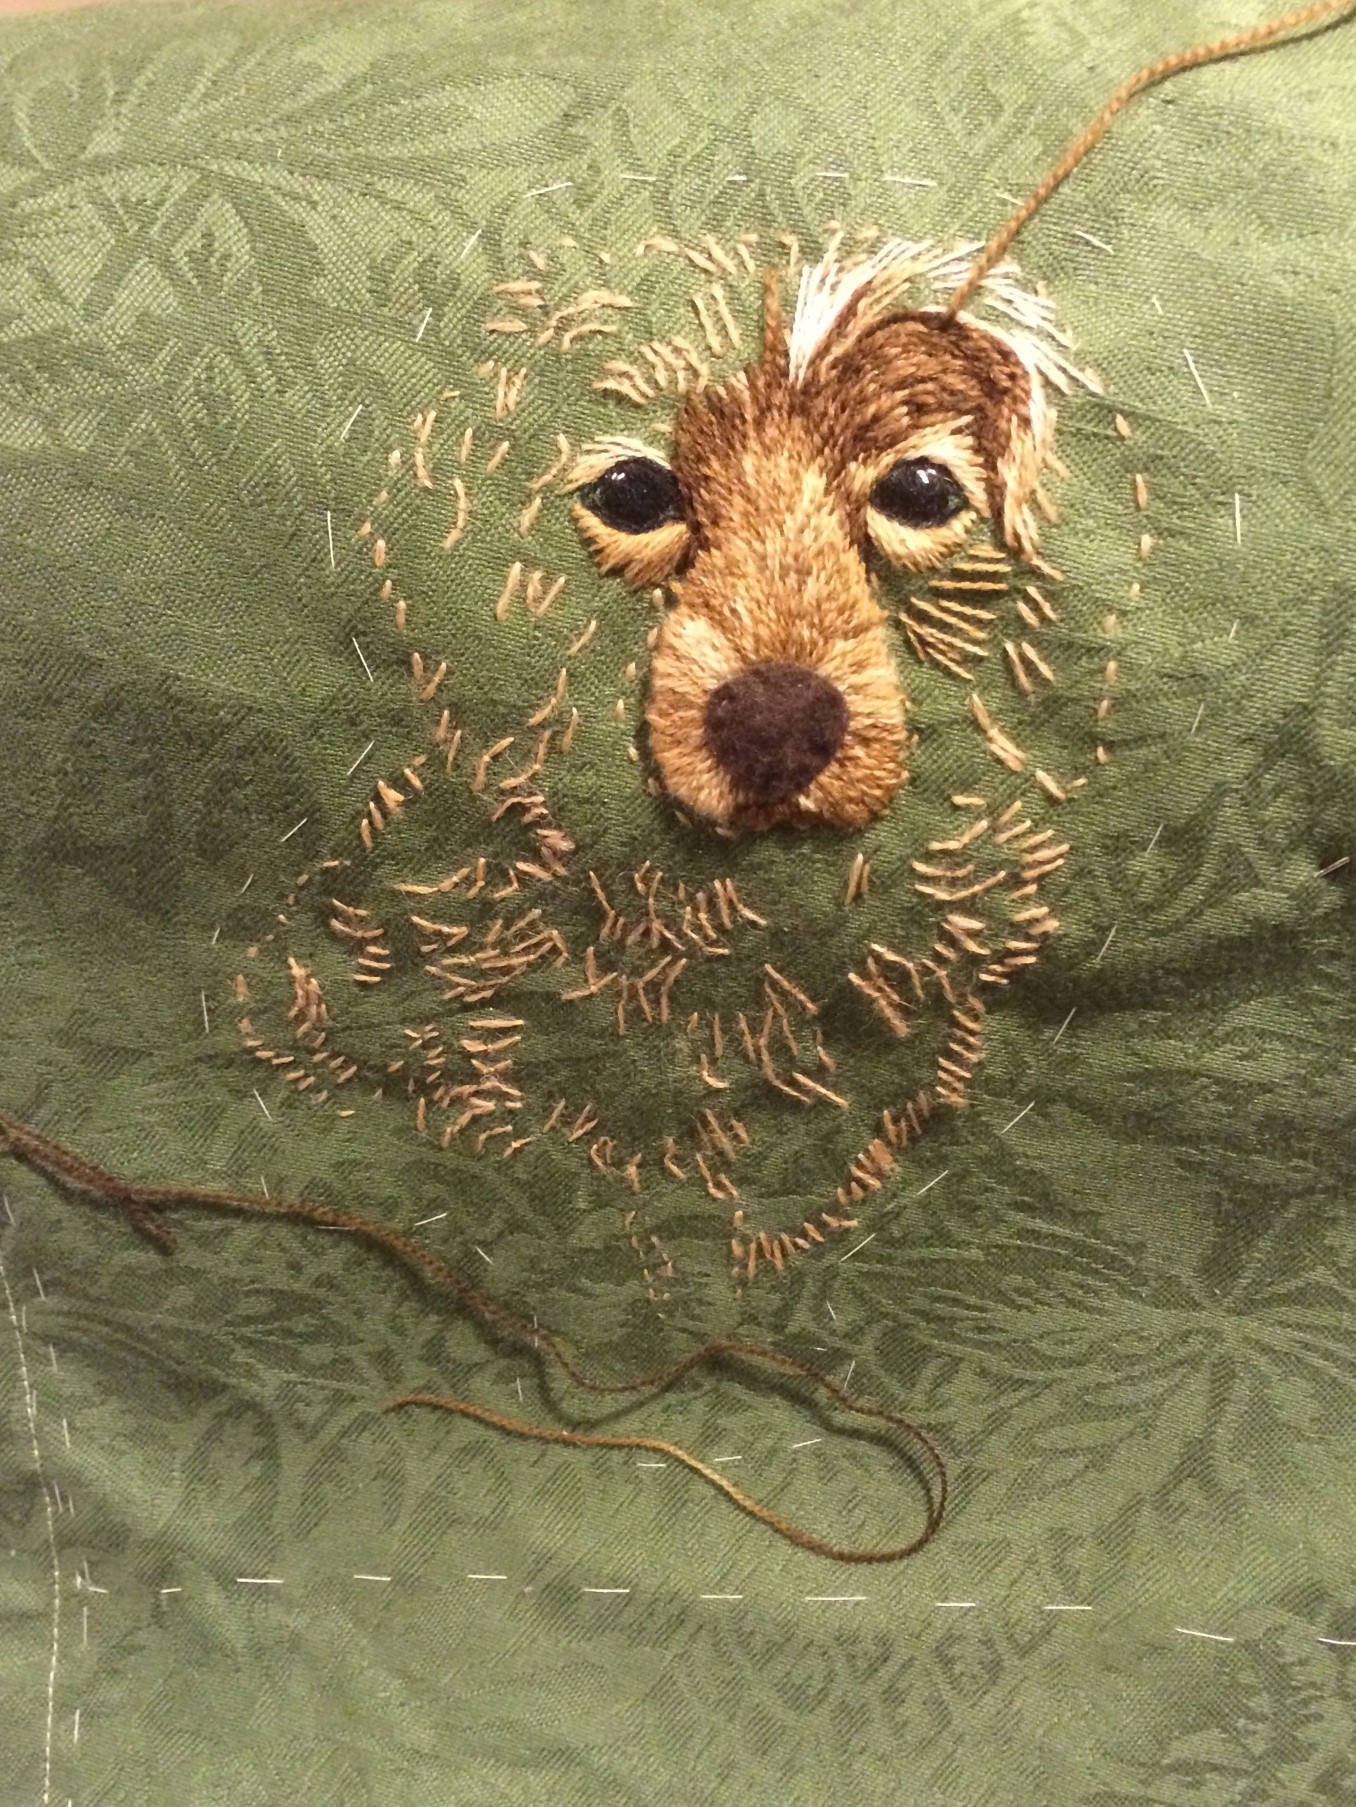
This week,Jasper gets his neck and chest.
 Examine the frill around Jasper’s chest.
 ![]() Make sure that your mind’s eye has a very clear understanding of the frill’s placement and tone before attempting any stitching.
Make sure that your mind’s eye has a very clear understanding of the frill’s placement and tone before attempting any stitching.
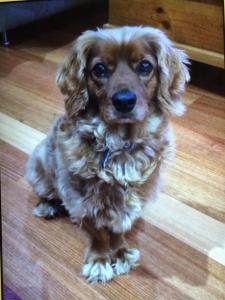
Refer Jasper’s Portrait
Turn to the back of your embroidery to the pattern tacked there. In the same direction as this pattern indicates, sew some stitches in line with the fur frill.
Turn back to the front. A guide has appeared to allow us to see the frill’s position.
Continue to embroider this area in the lightest tone
 In the neck area similarly, the lightest tones stand out.
Again, keeping in synch with the pattern on the back, embroider these areas first.
The darkest tones now become obvious and can be embroidered next. In some areas the difference between dark and light is too strong and can be softened by using medium tones.

– Glorious dimensional basket of striking proteas and grevillea.
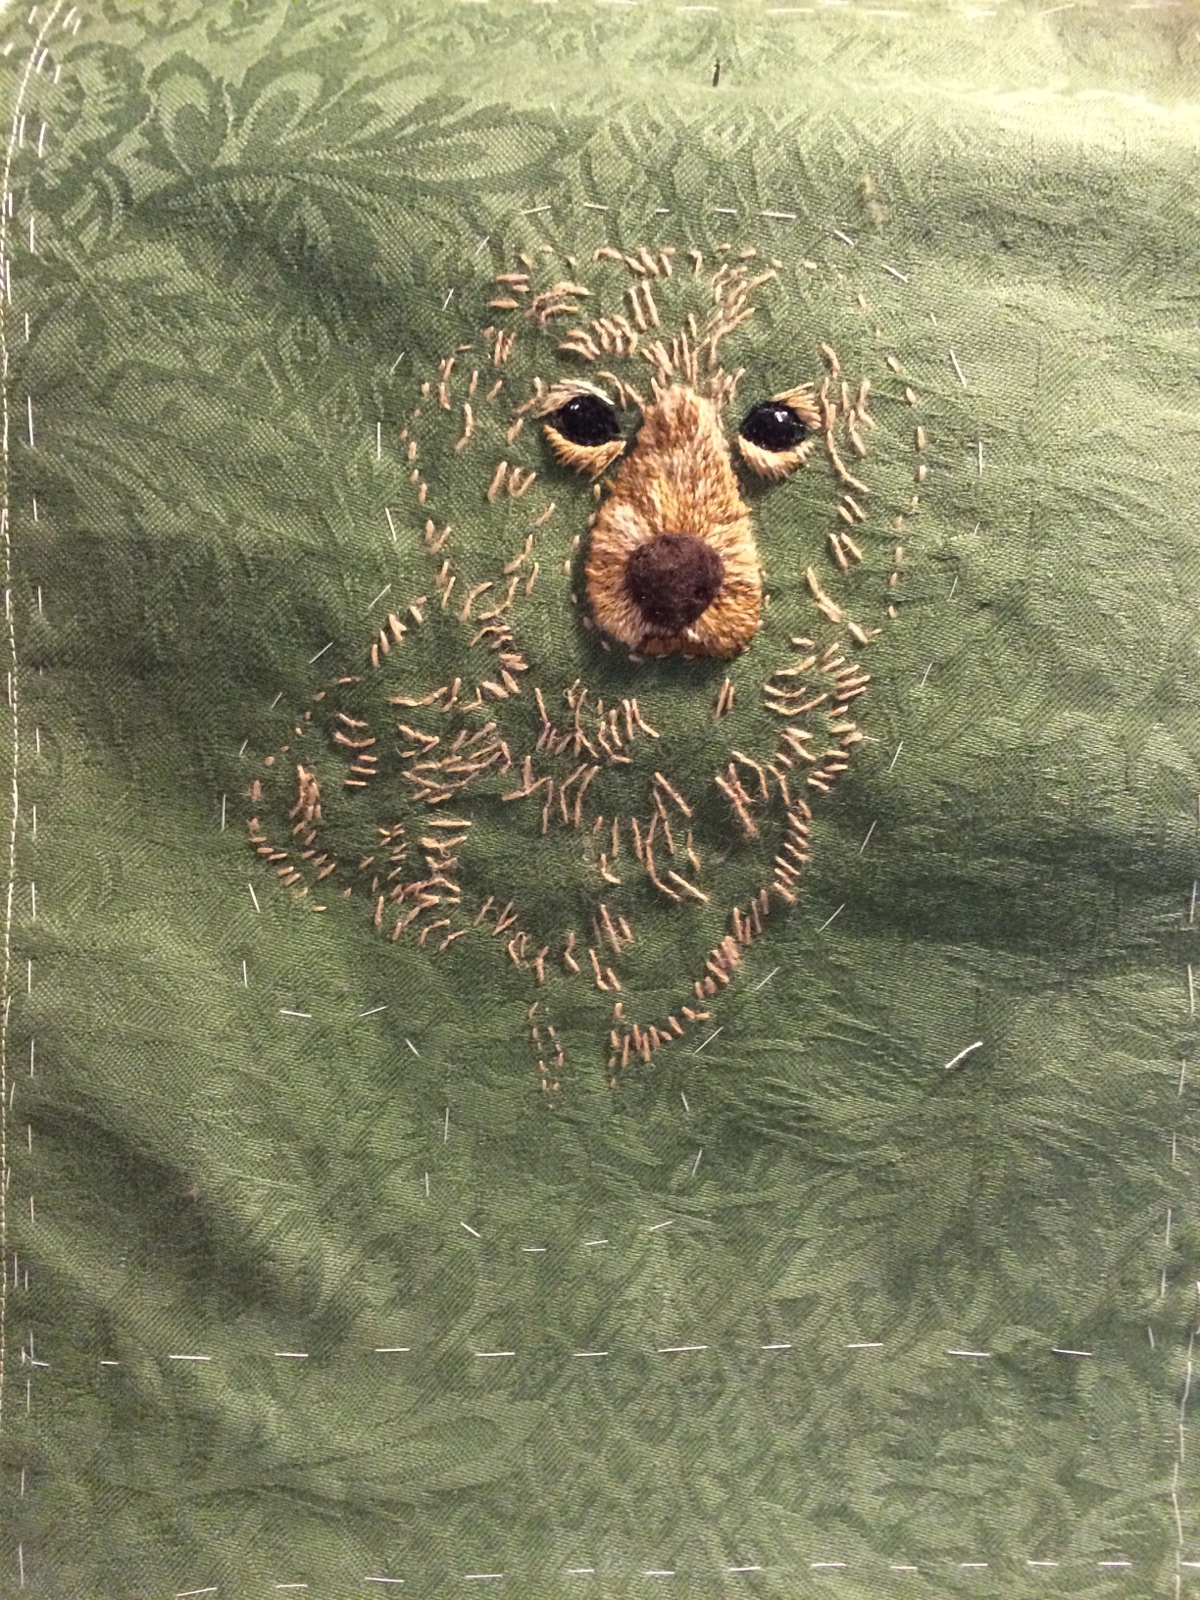
Let’s look at the jowls area and under the ears. 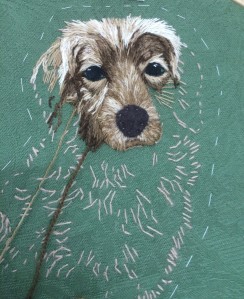
This area is very dark compared to other tones in the picture. Refer to Jasper’s portrait.
With darkest thread tone, embroider with the angles of the stitch following the direction of the fur.![]()
A clue here is to ask yourself which way does the fur sit naturally.
Which way would you pat the dog? This is how you stitch the fur.
If you could put your hand on this embroidery and stroke this dog, would you be able to brush the fur smoothly or rub against the angle of your stitches to rub him up the wrong way.


Begin with the lightest areas. In this case the edge was done first but with two different angles, one layering over the other.
Sections of darker tones were then incorporated into their places. Blend each tone into the other.
![]() Remember this is a picture and we are not painting by numbers.
Remember this is a picture and we are not painting by numbers.
 With the original Jasper’s portrait as a guide, continue embroidering the other side of Jasper’s forehead with long and short stitch again taking care to follow the angle of the fur.

![]() The success of this picture depends on the values of tonal colors. i.e the depth of color in each strand of wool.
The success of this picture depends on the values of tonal colors. i.e the depth of color in each strand of wool.![]()

I stress to my students continually that you can’t see light without dark. Sometimes embroidery looks flat. Add a dark thread and as if by magic, the piece springs to life.
This principle works conversely. With light added to Jasper’s eyes around the bottom eyelids and highlights in the eyes, suddenly, Jasper is alive.
 Refer to Jasper’s portrait. Look closely at the dark and light areas of the forehead. These are the tones of color we are going to use.
1. Arrange the color tones of the threads from light to dark.
2. Where the portrait shows darkest, use the darkest thread tone.
3. Embroider in long and short stitch in line with the angle of the fur.
4. For the remaining areas, adjust the thread color tone according to the shading in the portrait.
 Embroider Jasper’s Nose:

Create the raised features:
1. Decide where raised features are to be. In this case the nose.
2. Cut out felt shape.
Cherrill used two layers of cream felt, and for the tip of the nose, one layer of black Tack into position on embroidery according to the pattern on the back.
3. From the back tack around the outline of the eyes.
4. Turn to the front and embroider the eyes with satin stitch. See Round & Oval Shapes

From tracing the pattern on a transparent fabric to the conclusion of the embroidered image as life-like as the photograph.
Join student Cherril Arthur, under Bev Tully’s guidance, in the demonstration of what can be achieved with thread painting.
It begins here and each week will feature Cherril’s cavalier-poodle cross Jasper.
Cherril traced the pattern on to a transparent material.
She tacked this material to the back of the main fabric. When the tacking was complete, the back looked like this image to the left.

On the front of the embroidery, the tacked outline of the dog looked like this. With further tacking stitches, she continued to bring the details of the image from the back to the front.
In my next post, we will learn how to build the face.
Slashed fabrics, sequins, crinkled chiffon and an Ostrich feather!
Tried it, Liked it, Used it!
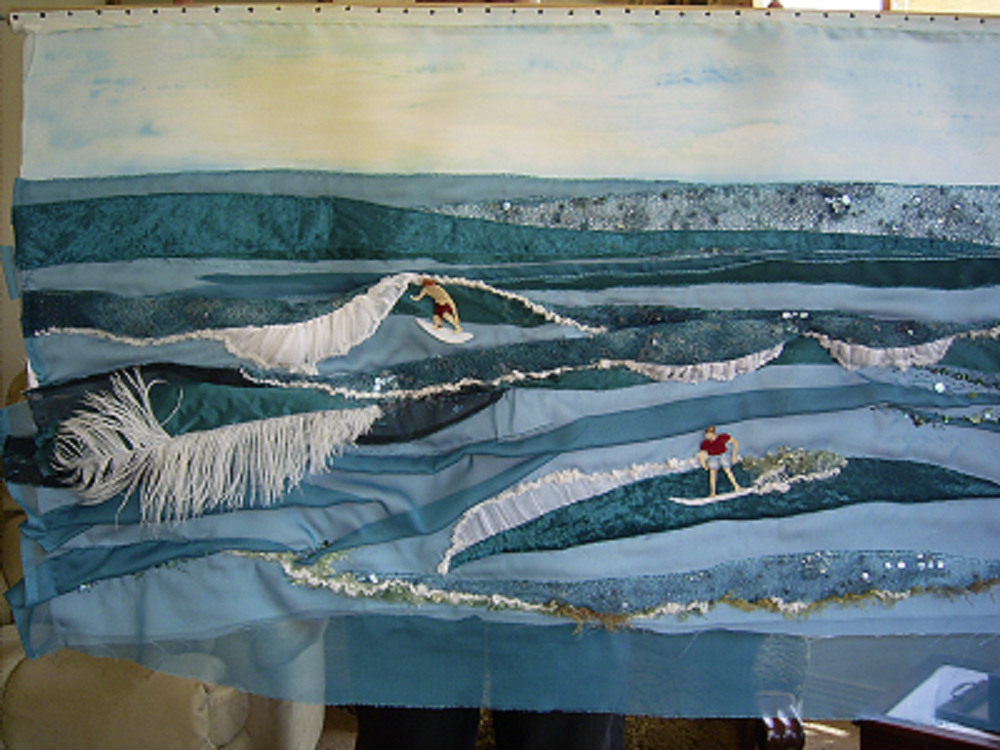
Multiple fabrics dull and shiny, right and wrong sides represent the waves. Sequins and knots are the froth and bubble; crinkled chiffon the incoming surf. The ostrich feather highlights the foaming breaker.
Let’s go surfing with my student Kathy Stokes.
