The design of the blanket was inspired by Shaun the Sheep. It was made for friends who live in the rolling plains of New Zealand. In the background we designed simple hills and a few trees, then snow capped mountains.
A fortnight sea voyage, what a dream! A cruise leaving Sydney Australia, meandering along the beautiful Eastern Coast of Australia and then heading on to Singapore. Six of those fourteen days are dedicated to stitching and embroidery.
And I will be aboard! I ‘ll be teaching as part of the Needlework Tours Cruise in 2017, 19th April to 3rd May fully escorted.
I have prepared three projects; each one very different from each other. One was featured in Inspirations Issue 88, the other two are brand new designs.
Protea Basket A beautiful three dimensional embroidery sewn in fine wool, silk and rayon thread.
Beaded Vase Ribbon Embroidery of a sweet bowl of flowers in a Beaded Vase.
Bridge at Monet’s Garden
This famous scene is recreated using a dry needle felting technique for the background and embellished with embroidery.
On the 9th April 2016, it’s the Western Port Craft Fest and I have been invited to be one of the speakers. My appearance will be at 1.00 pm at Hastings Uniting Church Hall. Their very attractive website details all the events, attractions and exhibitors.
The Fest is a celebration and exhibition of the best craft work in the Western Port Area and on the Mornington, Peninsula, Victoria, Australia. I am delighted to have been invited to present a talk on my passion for embroidery and share my experiences of teaching here, there and far-flung places.
For those of you who can make it, let’s meet up on the day.
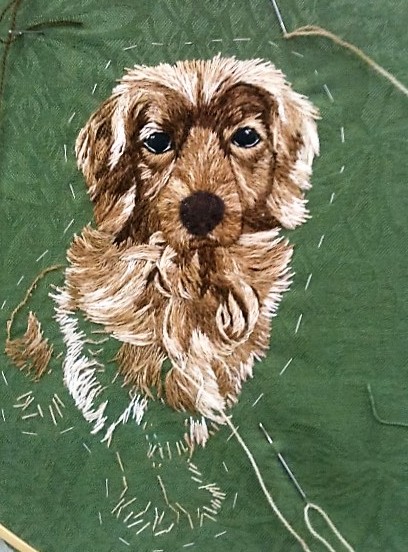
Jasper has achieved his back coat and leg, and very fine he is looking too. The paws look very smart.
Apply the same techniques we used in the previous posts of Jasper’s story to embroider the remaining areas.
This is not the end for Jasper…he is looking very neat. His unique character and individual charisma remain to be portrayed; a finishing touch, an occasional flourish to be added. In other words, his fluffy bits are still to be tweaked.
Watch for Jasper’s finale, brushed up and beautiful.
Friends and Followers. Happy New Year 2016. New adventures, new embroideries, new challenges. Go where you have not gone before where wonderful discoveries await. With the festivities coming to an end, it is time to be inspired, resolve to complete those UFOs and plan our next project. Jasper is nearing completion. Keep tuned.
 Collette has finished her blanket.


 Jasper has achieved his back coat and leg, and very fine he is looking too. The paws look very smart.

 Showcase Feature